
Shipping in the Small Parcel Space
Once you've packed your small parcel orders, it's time to enter the relevant shipping information and print shipping labels for each order. This article reviews how to ship small parcel orders in the Small Parcel space.
Before you can begin generating shipping labels with SmartParcel, there are a few configurations that must be completed:
- SmartParcel is turned on and enabled for your account under Admin > Settings in the WMS
- SmartParcel settings are configured via the Small Parcel Settings page
- All orders include a valid ship-to address, line items, and accurate carrier information
- If using a Zebra label printer, Zebra Browser Print is fully configured (see Configuring Zebra Browser Print for instructions)
- Have the following permission assigned to your user role: Orders Module > Manage Orders > SmartParcel
Step 1: Enter shipping information (optional)
Before you can generate your shipping labels, it's important to configure the shipping information for your order(s) from the Small Parcel homepage.
You can also access the below shipment options in the WMS within the Carrier and Routing section of an order, as well as on the Find Orders page under Manage > Edit Carrier and Routing.
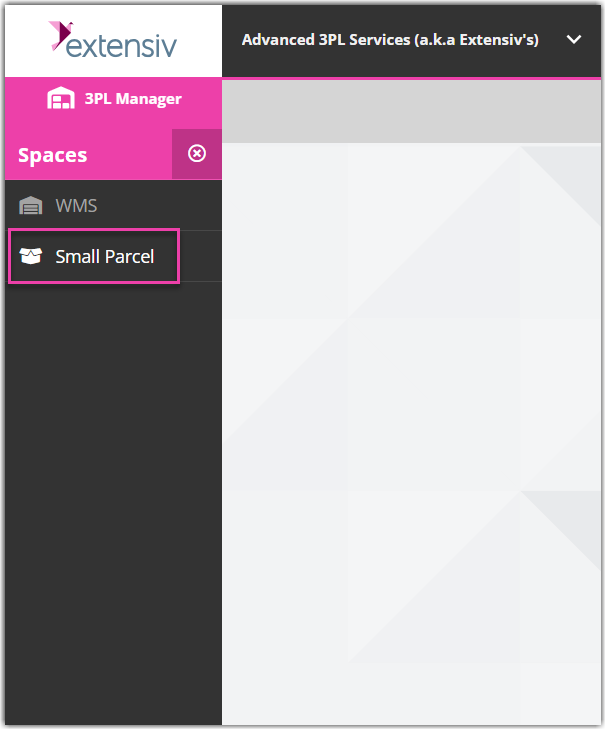
- If you're in the WMS, navigate to the Small Parcel space via the Spaces menu.
- If needed, use the search filters in the left pane to refine the grid results.
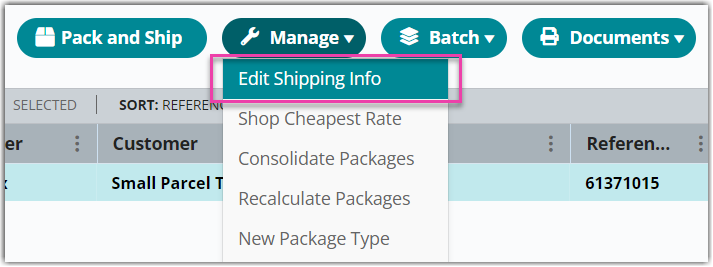
- Select one or more orders from the grid, then click Manage > Edit Shipping Info to open the Edit Shipping Information dialog.
If you are editing shipping information for multiple orders, varying field values display as 'Various'. If you modify a value with multiple orders selected, please note that any saved changes apply to all selected orders.
- The top Carrier Information container populates the shipment details on the order(s). Review and update this information as needed.
Note: If you enter a shipment date into this window, the system will print your labels for future pick-up. The shipment date you enter should correspond to the date you want the package to be picked up from the carrier.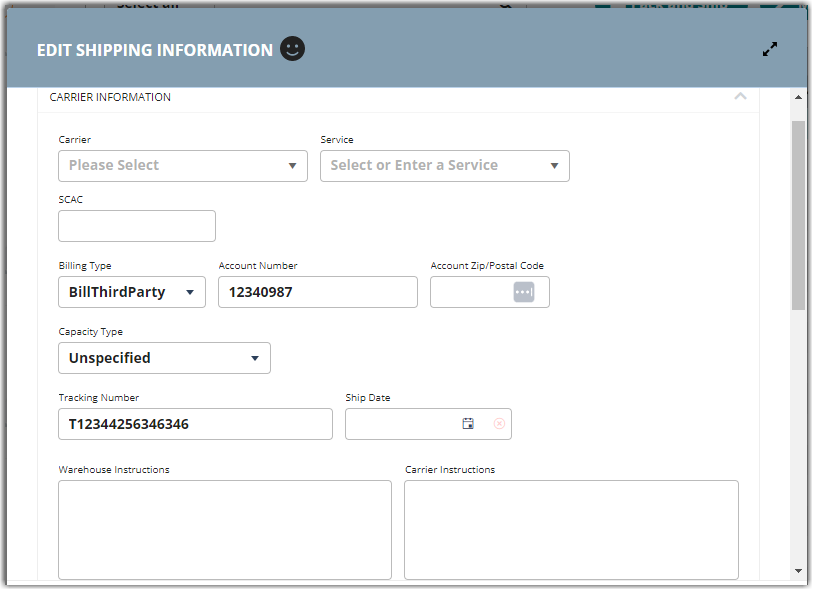
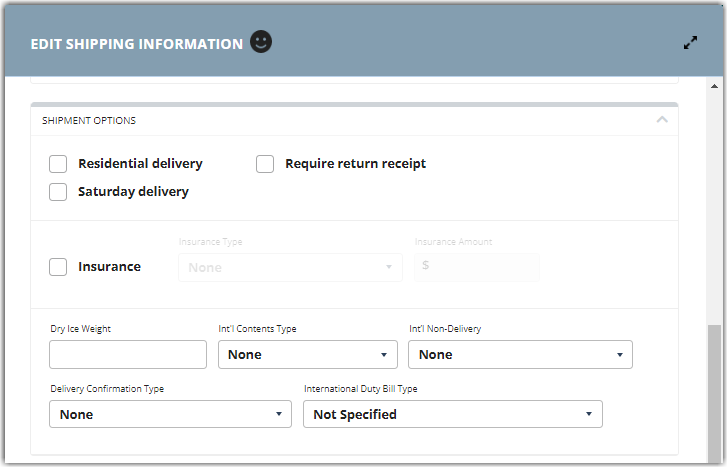
- The bottom Shipment Options container allows you to specify delivery and insurance options. Complete each field as needed.
Each field is detailed below—Please note that those that contain asterisks (*) indicate that not all carriers and service levels support the delivery option. If one of these options is selected with an unsupported carrier/service, you will receive an error message when you print your shipping labels.- *Residential delivery: When checked, indicates that the delivery address is residential
- Require return receipt: Not currently supported
- *Saturday delivery: When checked, indicates that you require Saturday delivery for this shipment
-
Insurance: When checked and completed, include insurance amount in the final shipping charge
When adding insurance to your package, you have two options:
Carrier – Select this option when you want to add the carrier’s insurance. Note that some carriers include default insurance coverage, and you will not be charged for added insurance with a value equal to or less than the carrier's default coverage amount. Please check with your carrier representative for questions on the default coverage amounts.
Third-Party – Select this option when you have purchased insurance from a third-party provider.
- *Dry Ice Weight: Indicates the amount of dry ice contained in the shipment
- Int'l Contents Type: Identifies the contents of the order (if no selection is made, the system defaults to Merchandise)
-
Int'l Non-Delivery: Specifies the action a shipping carrier should take if they are unable to deliver an order to the specified recipient—choose from the following options:
- Treat as Abandoned: Leave the package in the most secure location at the specified address (defaults to this option if no selection is made)
- Return to Sender: Return the package to the shipping facility or the defined return address (see Configuring Return Labels for more information)
-
Delivery Confirmation: Indicates what type of confirmation an order requires—choose from the following options:
- None: No confirmation required
- Delivery: Recipient receives a text or email notification upon delivery
- Signature: Recipient must sign for the delivery
- Adult Signature: Recipient must sign for the delivery and be at least 21 years old
-
Direct Signature: Someone at the delivery address must sign for the delivery (specific to FedEx)
- Once you've entered the necessary shipping information, click Save to apply these changes to all selected orders.
Step 2: Print shipping labels
After all the relevant shipping information is specified on your orders, you're ready to generate and print your shipping labels.
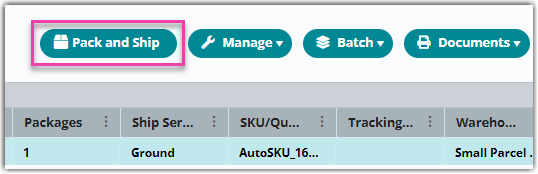
- Select the relevant order(s) from the Small Parcel grid, then click Pack and Ship to open the Pack and Ship Orders dialog.
You can also identify a single order by using the search field above the data grid to scan or enter the order's transaction ID, reference number, tracking number, or bin ID.
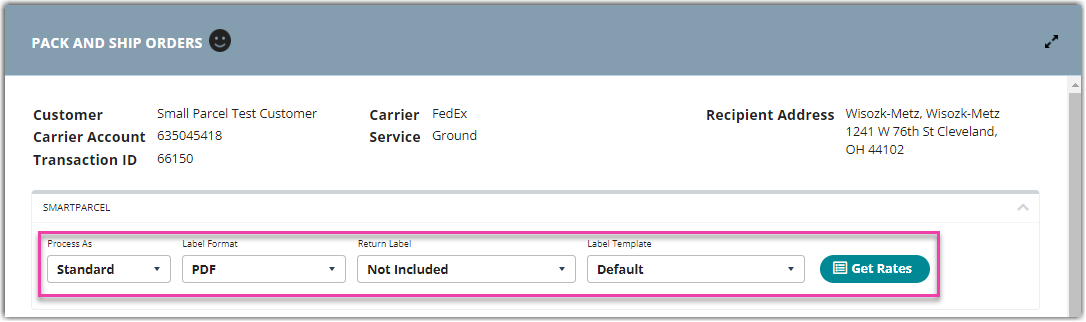
- Select your label preferences in the SmartParcel container. (If you do not have SmartParcel enabled for your account, this section is disabled.) Each field is defined as follows:
-
Process As: Specify whether you're processing a standard or high-volume (HVP) shipment
For more in-depth guidelines on HVP, see Using High-Volume Processing (HVP) with SmartParcel.
- Label Format: Select the format you'd like to use to print and reprint your shipping labels*
- Return Label: Indicate whether you want to print a return label with each package (not supported with HVP)
- Label Template: Select which report template to use for your shipping labels*
- Get Rates: Click to request a list of available shipping rates, then select Save to apply the selected rate to the order (must have rate shopping configured)
- Batch Name: If processing HVP, enter a name to easily identify the batch of labels
- If printing combo labels for HVP shipments, you must select PNG (Combo Label) as the label format and then select your label template via Manage > Reprint Labels after you've processed your labels via HVP. Please note that this is not supported with multi-package orders.
If you need to update the ship-to address, simply hover over the 'Recipient Address' area and select the Edit icon to open the Edit Address Details dialog. Modify each field as needed, then click Save.
-
Process As: Specify whether you're processing a standard or high-volume (HVP) shipment
- After you make your selections, you can queue your batch of shipping labels using one of the following options.
- If you are working with a single order and packed the order using SmartPack, scan 'Pack and Ship' from your barcode sheet or click Pack and Ship, then print your packing slips as needed.
- If you are not using SmartPack, click Ship.
- Once you queue your shipping labels, the printing process varies depending on whether you're using standard or high-volume processing.
- If using standard processing, label progress is shown in the Running Tasks dialog (the gear icon in the top tab bar). Once the processing completes, the Small Parcel grid refreshes and the label files generate automatically.
- If using HVP, label progress is shown under Manage > Print HVP Batches—see Using High-Volume Processing (HVP) with SmartParcel for more details.
- Regardless of your processing method, the following grid values update accordingly once you print your labels: Parcel Label Type, Small Parcel Ship Date, and Tracking Number.
- After your orders are packed and shipped, close them on the Small Parcel homepage via Manage > Close Orders.
If you're using Google Chrome as your browser and find that your labels are printing blank, you must configure Windows to auto-open PDF files using the Firefox browser or Adobe Acrobat Reader.
To do this, make sure you have Firefox or Adobe Acrobat Reader installed on your machine, then follow the steps below.
- Open Settings from the Chrome browser menu, select Site Settings > Additional content settings > PDF documents, then enable the setting to 'Download PDF files instead of automatically opening them in Chrome'.
- Right-click on a PDF file downloaded to your device, then select Open with > Choose another app.
- Select Firefox or Acrobat Reader from the list of options, click the selection box to 'Always use this app to open .pdf files', then click OK.
- Download a PDF file in Chrome, select the up-facing arrow next to the file name, then click Always open with system viewer. PDF files now downloaded with Chrome will automatically open in the application selected in Step 3.
