
Making Adjustments
Overview
This article lets you create adjustments for inventory and billing for one of your customers.
Inventory adjustments could be needed for several reasons, such as receiving damaged products or incorrect lot numbers, or mistakenly confirming an unfinished receipt with the auto-allocation feature turned on. Charge adjustments are used any time you need to charge customers for fees that are not tied to a specific inventory transaction.
Product Type
3PL Warehouse Manager
Audience
The use of this article is intended for 3PL Warehouse Manager that's dealing with Inventories.
How-To Guide
Creating an Inventory Adjustment
To create an inventory adjustment, this permission is required: customer.items.manage
To make inventory adjustments, you must have the following permission as part of your assigned user role: Inventory Module > Adjust Inventory.
1. In 3PL Warehouse Manager, open Inventory > Adjust Inventory.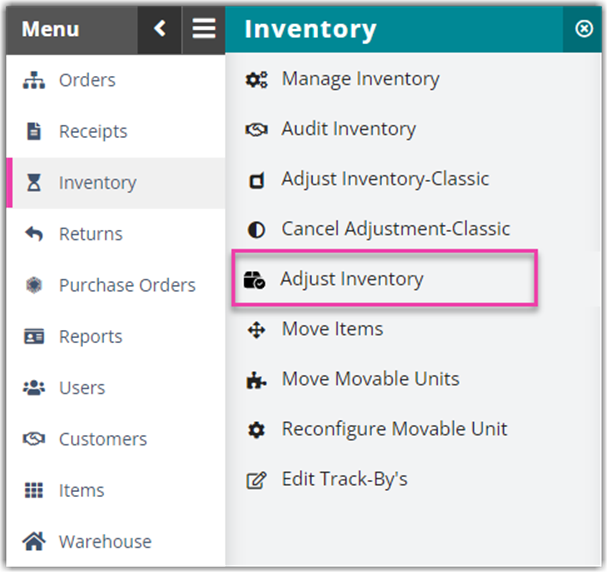
2. Click Create.
3. Select the appropriate Customer and Warehouse from the respective drop-down menus.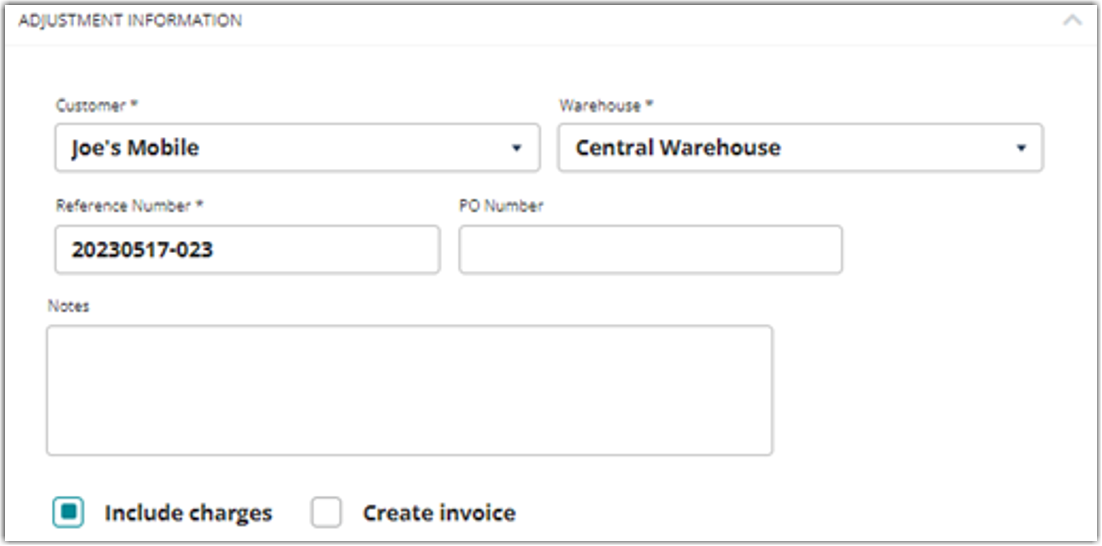
4. Enter a unique Reference Number.
Once created, you can find all adjustment transactions on the Adjust Inventory page and on the Transaction by Activity Report. We recommend having a naming convention specifically for inventory adjustments to easily distinguish them from other transactions after generating this report.
5. Provide the following optional transaction details:
- PO Number: Provide an associated purchase order
- Notes: Provide additional descriptive information about this adjustment transaction.
- Include charges: Allows you to add charges related to the adjustment transaction
- Create invoice: Automatically sends an invoice to the QuickBooks Invoice Queue.
6. Select whether you want to Add inventory or Reduce inventory.
7. To add inventory, provide the details of the inventory you want to create, then click Add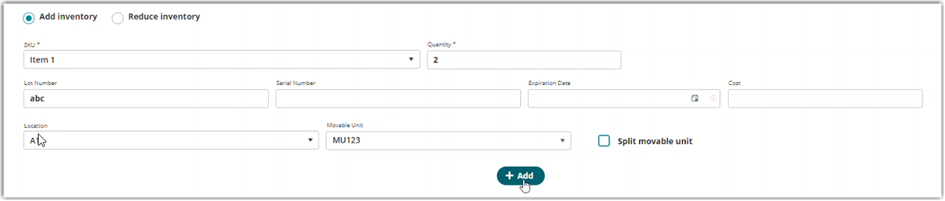
- Select the item and specify the quantity that you want to add.
- Specify any track-bys needed for the new items.
- Select a Location for the new items.
- Add the new items to a movable unit. This can be either a new or an existing movable unit.
- Select ‘Split movable unit’ to have the system auto-generate multiple movable units, if needed.
8. To reduce inventory, identify the existing inventory for which you want to reduce quantity, then click Add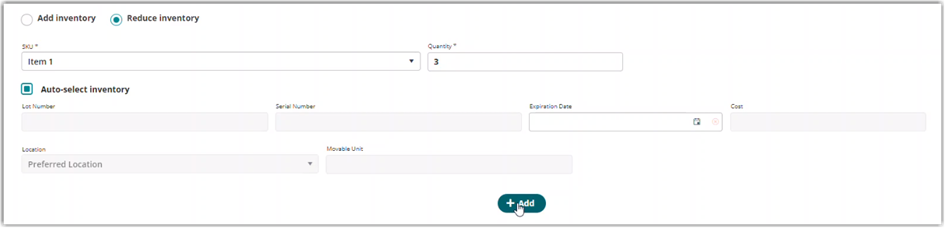
- Select the SKU and specify the quantity that you want to remove.
- Select ‘Auto-select inventory’ if you want the system to choose the inventory to remove based on warehouse allocation rules (FIFO, LIFO, FEFO).
- Provide track-by or location detail to filter the inventory list and make it easier to locate the items you want to remove from inventory.
9. If you are adding inventory, proceed to Step 10. If you are reducing inventory, the Select Receive Item dialog opens.
- In the Available Receive Items grid, select the rows where you want to remove quantity.
- In the Quantity to Remove field, specify the quantity you want to remove from that receive item, then click Add.
- Repeat until the Quantity to Remove = Total Adjustment. Click Save. The Select Receive Item modal closes, and the line-item reduction appears in the adjustment line-item grid, highlighted with red text to indicate it is reducing inventory.
10. Repeat Steps 6–9 for each item you need to adjust.
11. If you selected Include charges, click Next. If not, proceed to Step 12.
The Charges modal lets you bill your customer for the Adjustment. You can apply both predefined charges and ad hoc manual charges to an adjustment transaction.
- Predefined charge:
- Predefined charges display automatically in the Charges grid.
- To apply a predefined charge, click the ‘Number of Units’ field for that charge, then specify how many units of that charge to apply.
- The number of units is multiplied by the ‘Charge Per Unit’ to determine the total charge.
- Ad hoc manual charge:
- Click Create a Manual Charge.
- Select Charge Category
- Enter Charge Label
- Enter Type of Charge Unit
- Enter Charge per Unit
- Enter the Number of Units for this charge.
- (Optional) Enter additional charge info, including General Ledger Acct number, External Accounts Receivable, External Item Identifier, and External Item Description.
- Click Add Charge.
- Click Create a Manual Charge.
- Click Calculate Charges to view any automatic billing charges the system will apply to this transaction as it is currently configured. These charges are “read-only”. You cannot modify them from the Charges grid.
12. Once all additions and reductions are added, click Apply Adjustment to confirm the adjustment details and populate the transaction in the Adjust Inventory grid.
Reversing an Adjustment
This option allows you to cancel an adjustment you have previously made.
1. To cancel, select any adjustment on the list and click Reverse.

2. In the Cancel Adjustment window, indicate the Cancellation Reason and the Cancellation Fee, if any. You can also choose to Create Invoice to add on the Invoices.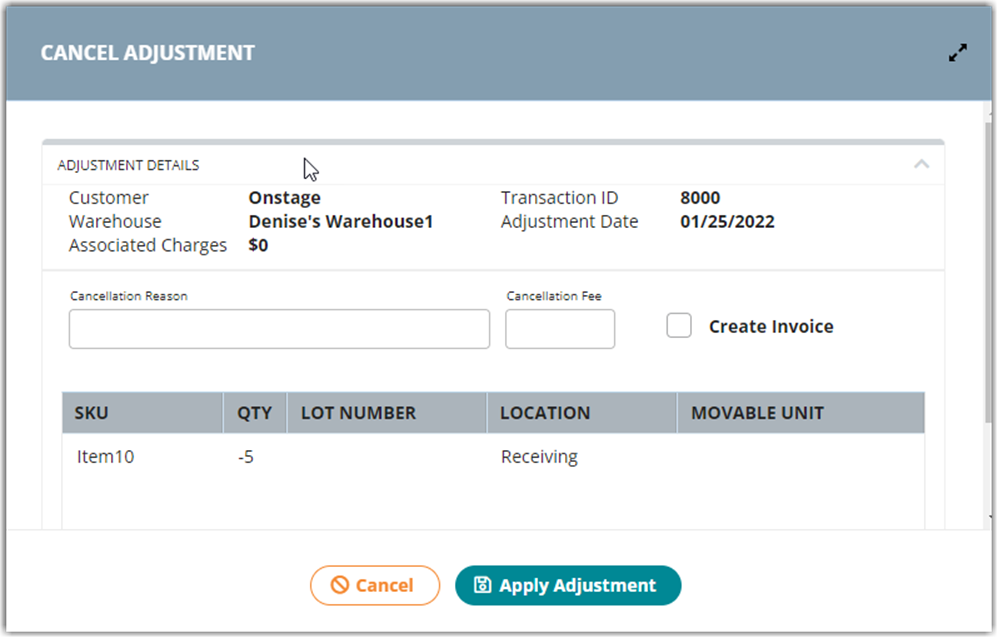
3. Click Apply Adjustments when done. Once canceled, the reference number of the adjustment is updated to end with the word CANCELED and the associated transaction number.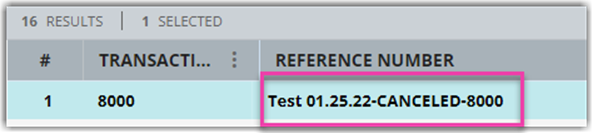
Creating a new Charge Adjustment
Charge adjustments allow you to create an invoice that populates on the Manage Invoices page.
To make charge adjustments, you must have the following permission assigned to your user role: Administration Module > Adjust Charges.
1. Navigate to Customers > Charge Adjustments in 3PL Warehouse Manager.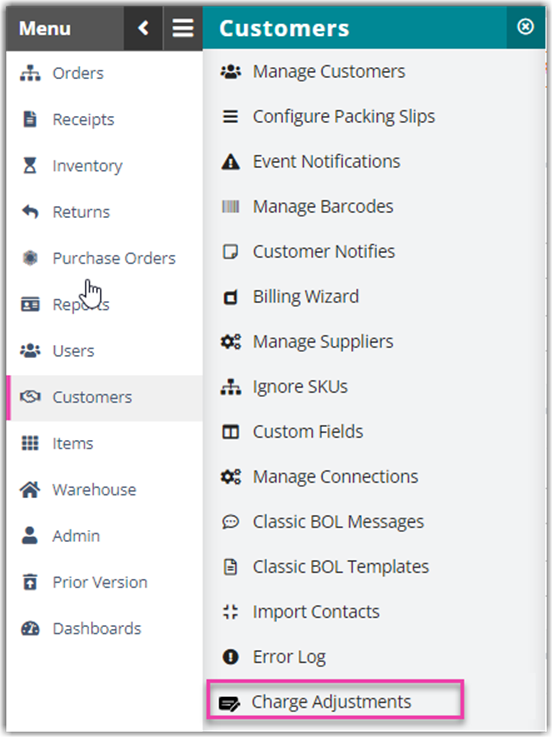
2. Click Create Charge above the grid.
3. Select the appropriate Customer and Warehouse from the respective drop-down menus.
4. Enter a unique Reference Number.
Once created, you can find all adjustment transactions on the Charge Adjustments page and on the Transaction by Activity Report. We recommend having a naming convention specifically for charge adjustments to easily distinguish them from other transactions after generating this report.
5. Next, enter a relevant PO Number, Charge Date, and Notes as needed.
6. If you'd like to automatically send an invoice to the QuickBooks Invoice Queue, click the selection box for Create invoice.
7. Click Create a Manual Charge.
- Predefined charge:
- Predefined charges display automatically in the Charges grid.
- To apply a predefined charge, click the ‘Number of Units’ field for that charge, then specify how many units of that charge to apply.
- The number of units is multiplied by the ‘Charge Per Unit’ to determine the total charge.
- Ad hoc manual charge:
- Click Create a Manual Charge.
- Select Charge Category
- Enter Charge Label
- Enter Type of Charge Unit
- Enter Charge per Unit
- Enter the Number of Units for this charge.
- (Optional) Enter additional charge info, including General Ledger Acct number, External Accounts Receivable, External Item Identifier, and External Item Description.
- Click Add Charge.
Entering a negative amount to the Charge Amount will give a credit on the customer.
8. Once all charges are added, click Create Charge to confirm the adjustment details and populate the transaction in the Charge Adjustments grid.
Reversing a Charge
This option allows you to cancel a Charge Adjustment you have made.
1. To cancel, select any adjustment on the list and click Reverse Charge.
2. In the Cancel Adjustment window, indicate the Cancellation Reason and the Cancellation Fee, if any. You can also choose to Create Invoice to add on the Invoices.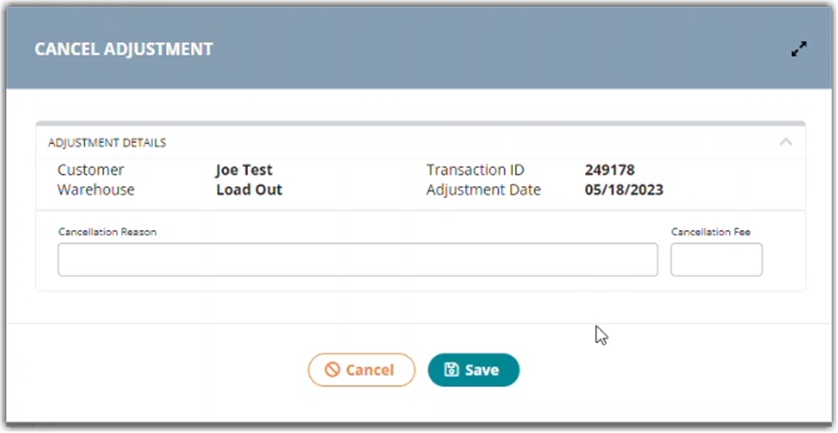
3. Click Save when done.
Once canceled, the reference number of the adjustment is updated to end with the word CANCELED and the associated transaction number.