
Navigating the Support Portal
3PL Warehouse Manager's Support Portal allows for full visibility into your warehouse's support cases and account information. You can submit and view support cases at any time, as well as monitor your API data usage, pay account invoices, and create REST API credentials. This single sign-on experience is integrated within 3PL Warehouse Manager and never requires you to log in to a different application.
This article reviews how to navigate and use the Support Portal.
To learn more about accessibility and general information relevant to submitting support cases, please refer to our Support Portal FAQs.
Guidelines
You can choose to watch the following tutorial video that outlines how to navigate the Support Portal, or feel free to read the written guidelines below.
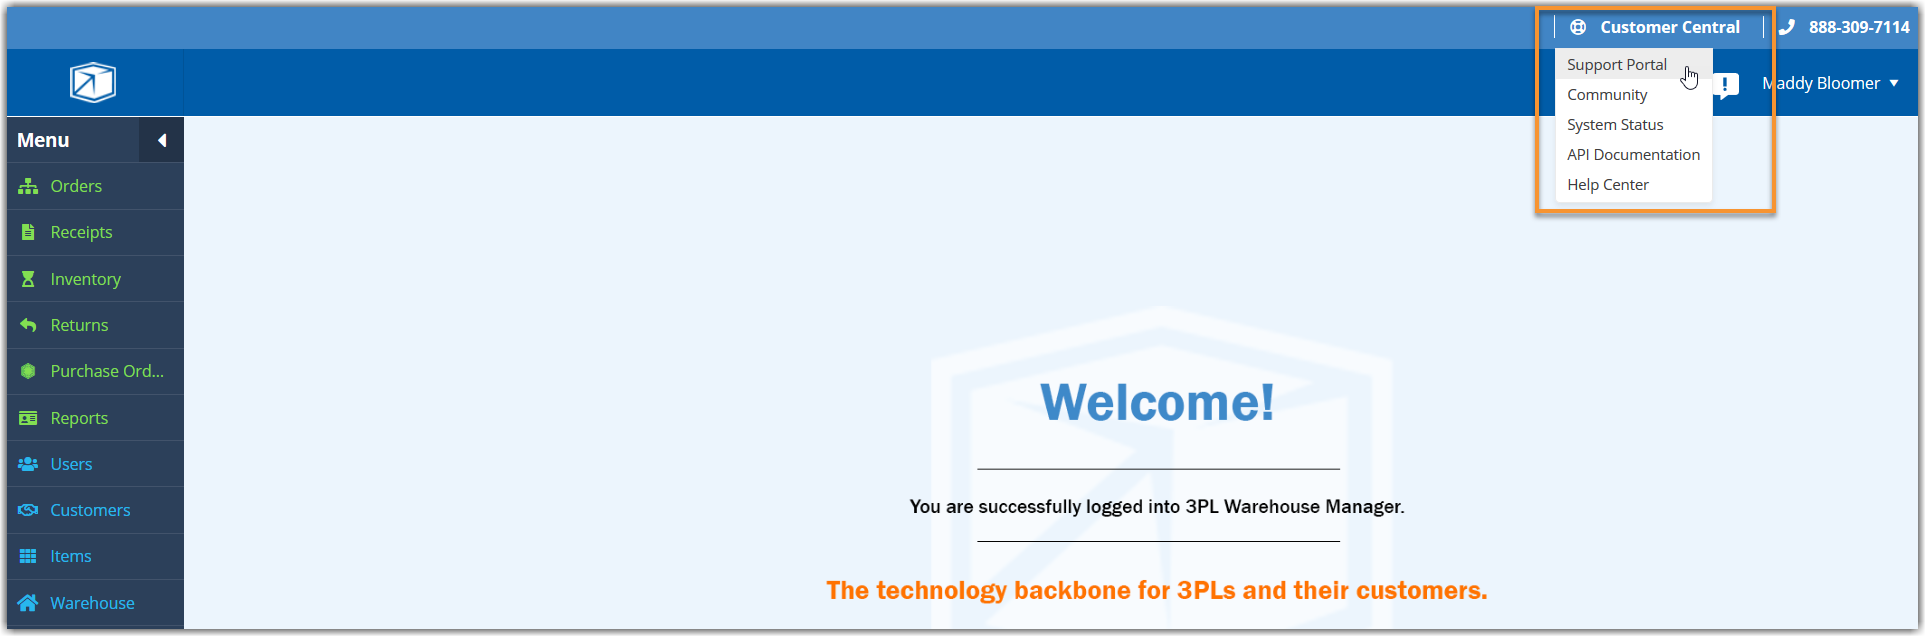
To access the Support Portal in 3PL Warehouse Manager, select Customer Central > Support Portal from the support navigation header.
Continue reading below to learn about each functionality available in the Support Portal.
Understand the navigation menu
Before you begin interacting with your support cases, it's important to familiarize yourself with the navigation in the Support Portal.

At the very top of the page, the light-blue support navigation header provides access to each Customer Central resource and displays our Support phone number. Note: This phone number should be used to contact us for urgent issues only—see Contacting Support to learn more.
Below the support navigation header is the main navigation menu, which contains links to each Support Portal page and a search functionality that allows you to search for a specific support case.
Access your account information
You can access critical account information, monitor your account's API usage, and pay invoices by clicking Account from the navigation menu.

There are three main elements on the Account page.
- The Account Information section displays your account's unique TPL Number and GUID, as well as the direct contact information for your dedicated Customer Success Manager (CSM).
Below this, you can find the Quick Links section, which provides links for requesting new API connections, EDI connections, and custom reports.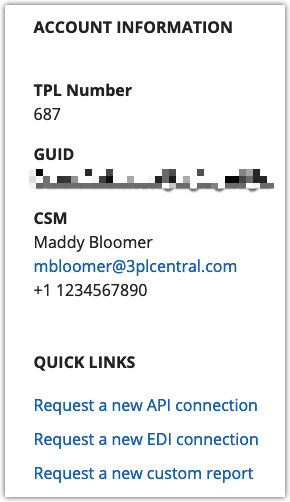
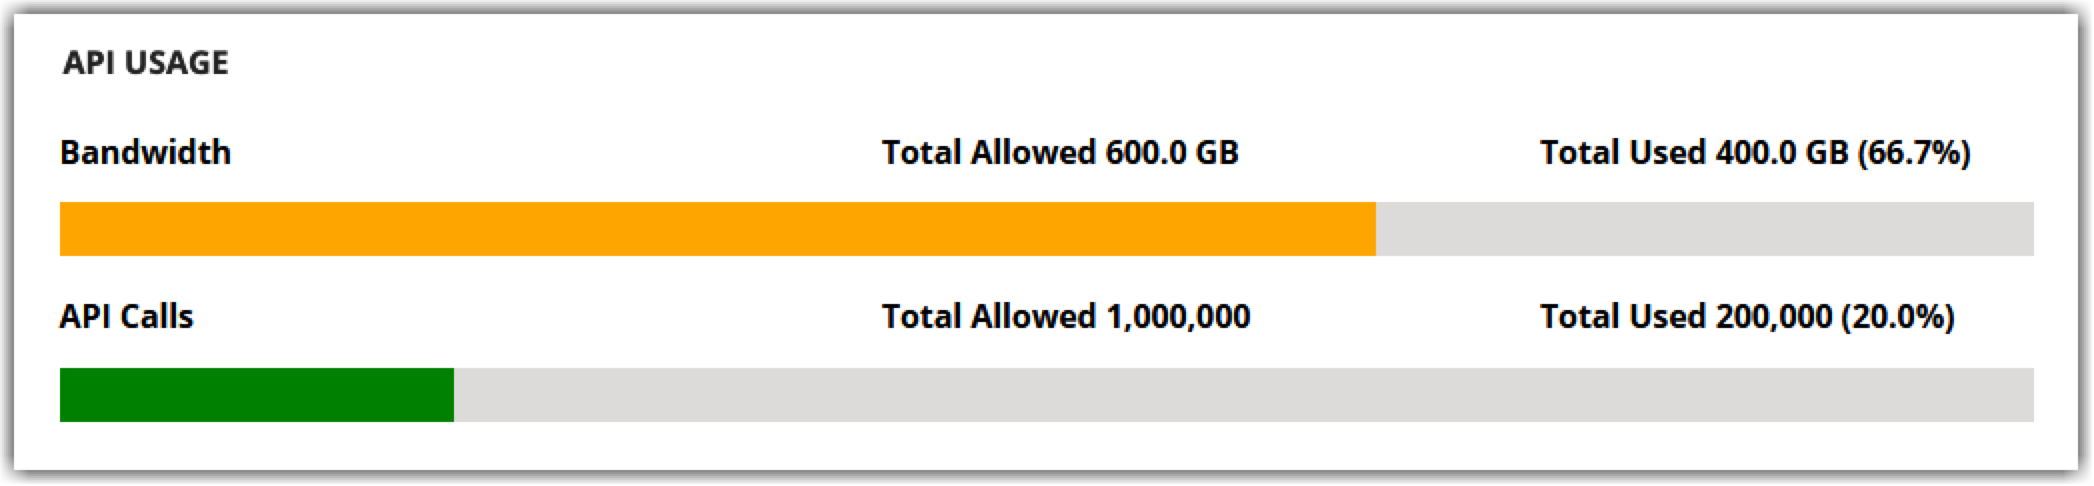
- The API Usage section provides a visual representation of your account's monthly API utilization, including the 'Total Allowed' bandwidth and API calls for the month and the 'Total Used' thus far.
- The Charges section populates your 20 most-recent invoices and allows you to select an invoice number to view the invoice summary. You can also pay an invoice directly from the Invoice Summary page.

Most of the available columns in the Charges grid are self-explanatory. The available values for the Status column are defined as follows:- (Clicked): Invoice summary was viewed via the Support Portal or the invoice email
- Current: Invoice that requires payment before the listed due date
- (Opened): Invoice email was opened without viewing the invoice summary
- Paid: Fully paid invoice
- Past Due: Due date has passed and the invoice needs to be paid
- Unapplied: Credit memo which has not been applied to your account (must contact Extensiv Accounting to apply this balance to an invoice)
If you have questions related to your Extensiv subscription or invoices, please reference our Subscription Invoice and Billing FAQs.
Create new cases
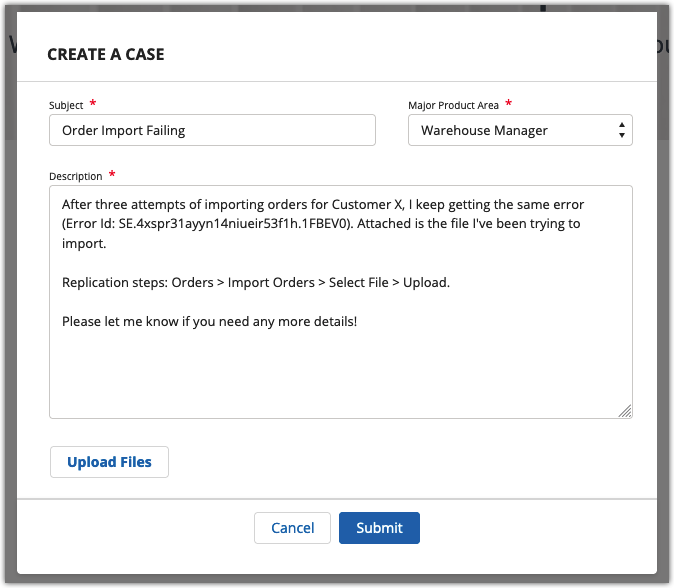
You can create a new support case directly from the Support Portal by selecting Create a Case from the navigation menu and completing each field.

You are required to fill out three fields on the form.
- For Subject, provide a short summary of the issue.
- For Description, describe your issue in detail—please provide exact replication steps where possible.
- For Major Product Area, use your best judgment to categorize your current issue. This ensures the case is sent to the correct team.
- Optional: You can also upload up to 10 relevant files to help our Support Agents troubleshoot your issue by clicking Upload Files at the bottom of the dialog.
Once you submit the case, you are redirected to the open case and receive an automated confirmation email. The case is also accessible from the Open Cases page, which is reviewed below.
Manage existing cases
To manage your existing support cases, select Open Cases from the navigation menu.

- A list of your Open Cases displays with specific information, including the case number, the subject of the case, the current status of the case, and when the case was opened.
- If you want to sort the support cases that display in the grid by case number, subject, status, or when it was opened, simply click on the relevant column header to sort the cases in ascending order. Click again to sort in descending order.
- On the far-right, you'll see the Case Status Definitions, which details what each case status means.
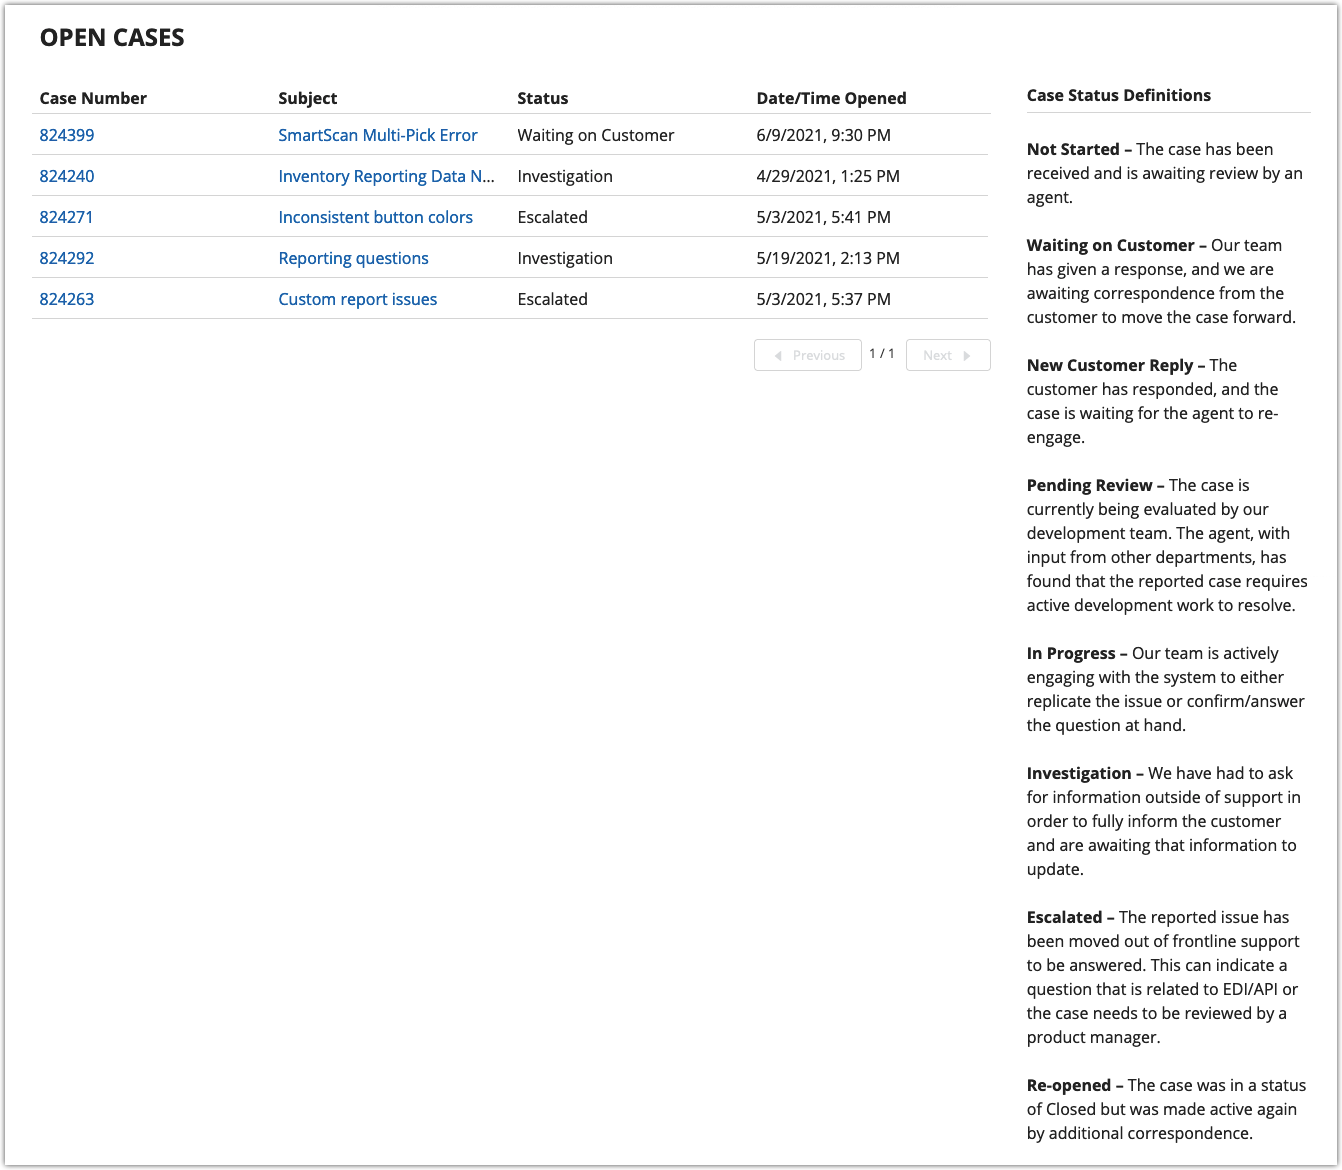
- To view a support case, click on the relevant Case Number or Subject.
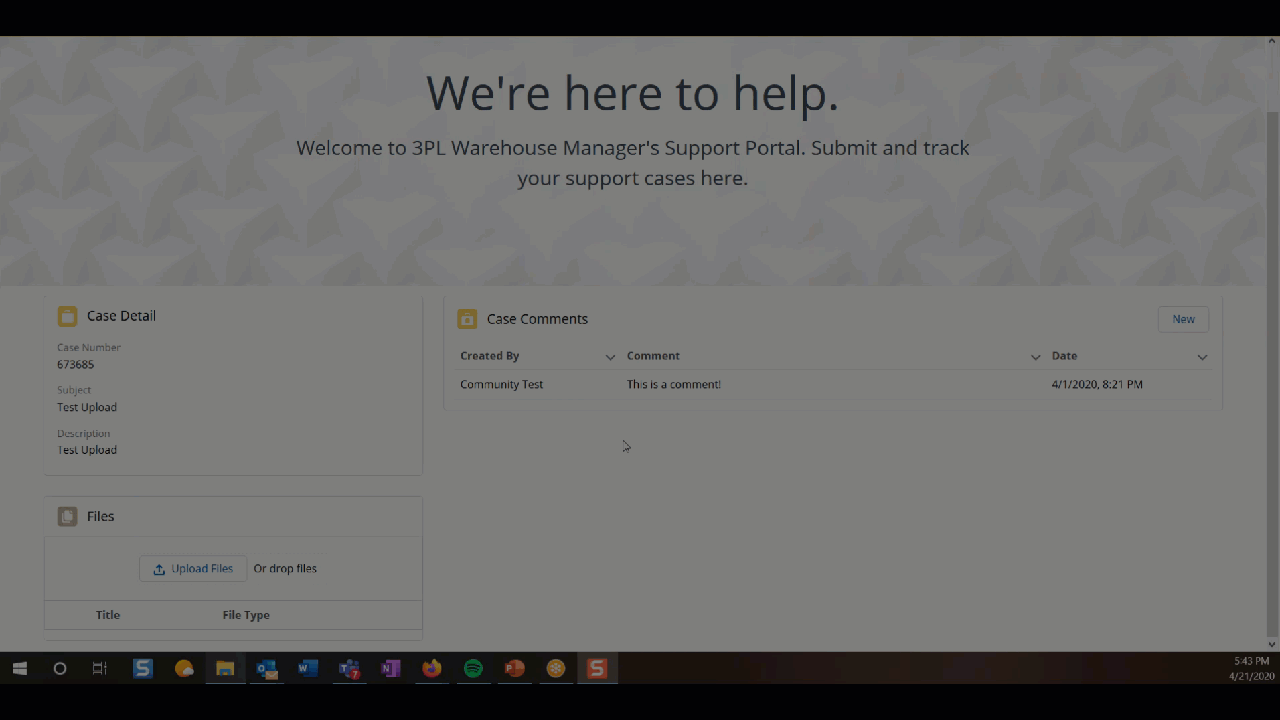
From here, you can update the case by adding a comment, attaching a file, or closing the case. Continue reading below for guidelines on each of these options.
Add a comment
To add a new comment to the support case, do the following:
- Click New in the top-right of the Case Comments section.

- Enter your comment, then click Add.
- The comment appears as most recent under Case Comments.
- To view comment details, select the arrow next to the name of the person who left the comment. You can also click Expand All to view details of the full thread.
Adding a comment does not reopen or change the status of a support case—if you need to do this, please reply to the email where case correspondence occurred. Once added, you cannot modify or delete a comment.
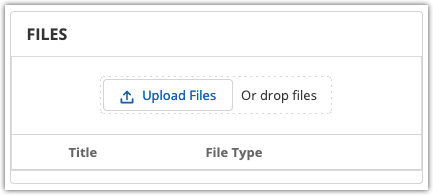
Attach a file
To attach a file to the support case, use the following steps.
- Click Upload Files in the Files section.
- Use < Ctrl > on your keyboard to select multiple files at once. After you select your file(s), a progress tracker displays.
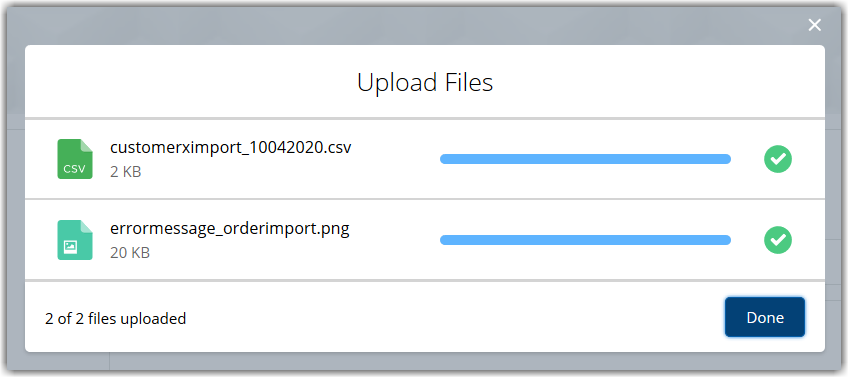
- Click Done to complete. A confirmation message displays, and the files populate in the Files section of the case.
- To remove an existing file from a case, click Delete next to the attachment.
Alternatively, for a simpler upload, you can drop your files directly from the relevant folder on your device—see below.
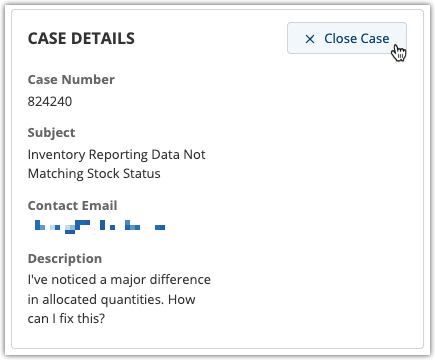
Close the case
If your issue has been resolved and the support case has not been closed by a Support Engineer, you can click Close Case in the Case Detail section to move the case to a Closed status.
Review closed cases
You can view your closed support cases by selecting Closed Cases from the navigation menu.

- Similar to your open cases, a list of your Closed Cases displays with the case number, the subject of the case, and the date/time it was closed.
- You can also sort the support cases that display in the grid by case number, subject, status, or when it was opened by simply clicking on the relevant column header.
- On the far-right, you'll see an explanation of the Closed status and a note as to why some cases may not appear on this page.
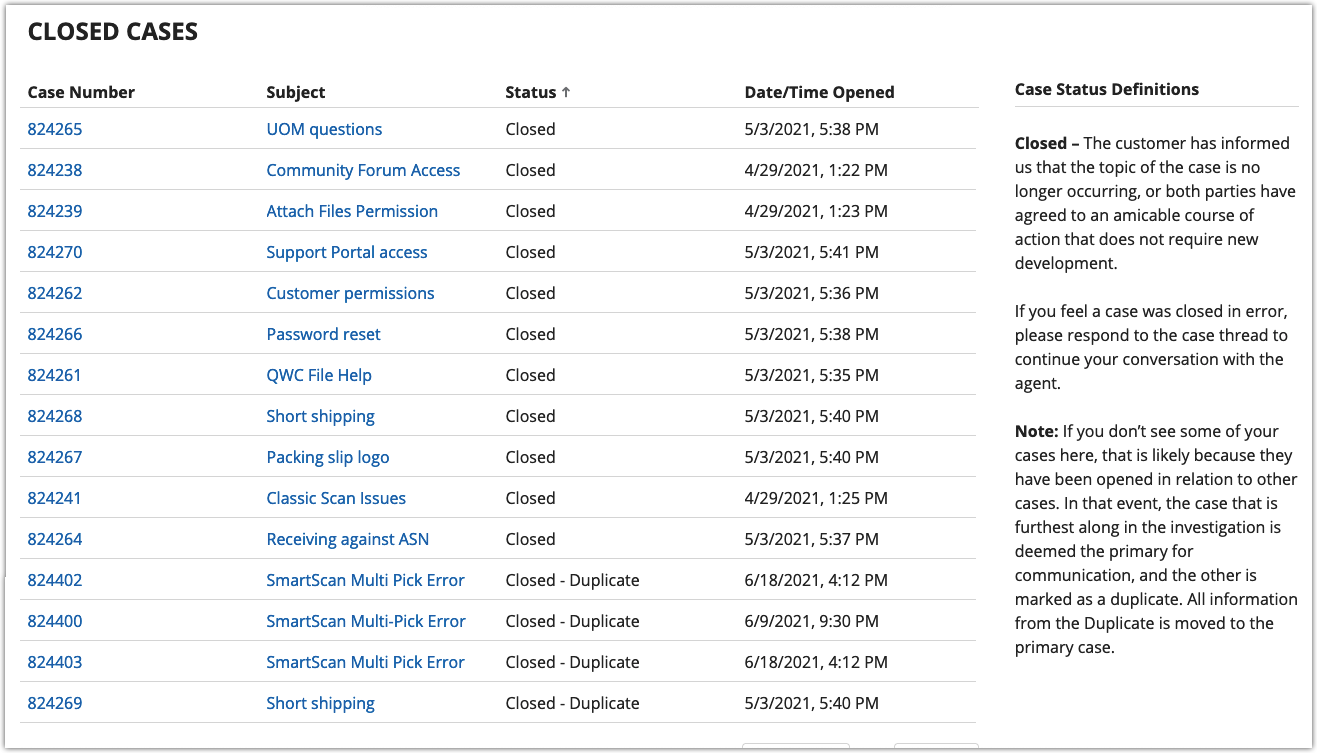
- If you need to re-open a closed support case, simply reply to the email where case correspondence occurred. If you need help finding a relevant email in your inbox, use the associated case number or subject to search for the latest correspondence.
Manage REST API credentials
If you're working with an external developer and need to provision REST API credentials, select Manage Credentials from the navigation menu.
This page allows you to view, create, and edit REST API credentials. Once created, the API credential enables the developer to access your instance of 3PL Warehouse Manager without having to send a request to our support team.
To access our complete guidelines for this page, please see Getting Started with Credential Management.