
Amazon Shopping Cart Connection
Extensiv provides an integration option with Amazon.com shopping carts through Integration Manager. The integration includes order creation once payment has been confirmed, as well as an optional inventory update push from 3PL Warehouse Manager to Amazon. The connection pulls orders from Amazon every 15 to 20 minutes, sends tracking updates once an hour, and syncs inventory once an hour (if enabled).
This article walks through the configuration of the connection between 3PL Warehouse Manager and Amazon.
In order to connect to an Amazon shopping cart, you or your customer must have a fully functioning and qualifying Amazon Seller account. You can find qualifying account information here.
If your customer is an official Seller Fulfilled Prime (SFP) member and expects you to fulfill Amazon Prime orders using Amazon's Buy Shipping services, please contact your CSM to learn more about how to enable Amazon Buy.
Set up the shopping cart connection
Once you have a qualifying Amazon Seller's account, you will have access to the Amazon Marketplace Web Service (MWS) platform. You must log in to your MWS account as an administrative user and generate your API credentials to provide to Extensiv. The following steps walk you through the process of retrieving your credentials.
- Log in to Amazon Seller Central.
- From the top navigation menu, select Appstore > Manage Your Apps.
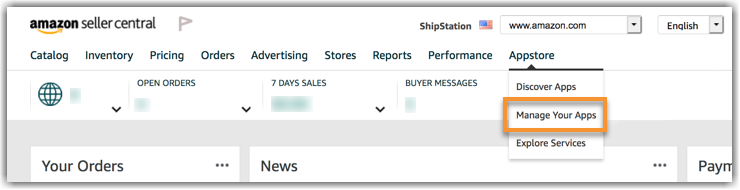
- Click Authorize New Developer.
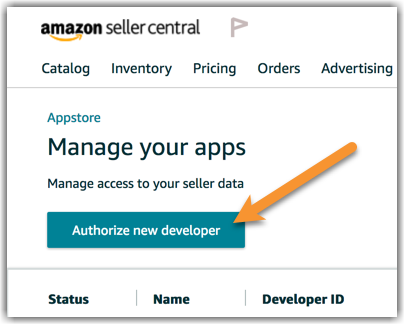
- Enter the 'Developer’s Name' as 3PL Central and the 'Developer ID' as either 6009-1364-0071 for North America and Brazil, 835211582249 for Europe, 267134821941 for Australia, or 11829100695 for Japan and Singapore, then click Next.
- Read and check the boxes to accept the Amazon MWS License Agreement to give Extensiv access to your seller account, then click Next.
- Amazon MWS will display your seller account connection values (i.e., Merchant ID, Marketplace ID, and MWS Auth Token). Record these values for the next step.
- If there are multiple Marketplace ID values (e.g., .com, .ca, .mx), please specify the ID for this connection.
- If you want multiple IDs to apply to the connection, please be aware that each marketplace is considered a separate connection by Extensiv.
- Once you have generated the API keys, please fill out our API Integration Survey.
After you submit the survey, you will receive a DocuSign from your Customer Success Manager within one business day. Once you complete the DocuSign, our Professional Services team will begin the cart setup process. These requests are typically completed 24–48 hours after receiving all the necessary information.
In light of changes due to COVID-19, we are temporarily increasing this turnaround time to a maximum of 72 hours. We thank you for your patience as we work through your requests.
If you have not received a DocuSign within the specified time frame or would like to know the project status, please reach out to your CSM.
Update orders via 3PL Warehouse Manager
Once 3PL Warehouse Manager has received and processed the Amazon orders, shipping and closing the orders will send the tracking numbers back to Amazon and mark the order as complete in your seller account.
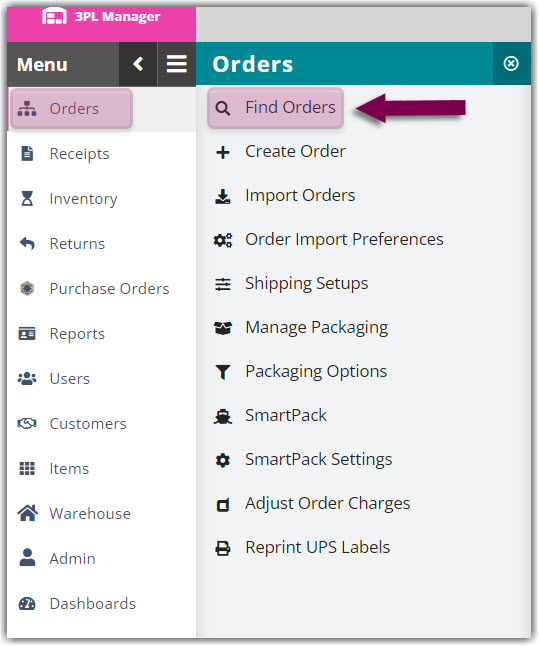
- In 3PL Warehouse Manager, navigate to Orders > Find Orders.
2. Select the order(s) from the grid that you need to close and mark as shipped. Use < Ctrl > or < Shift > on your keyboard to select multiple orders.
3. Hover over Manage, then click Ship and close.
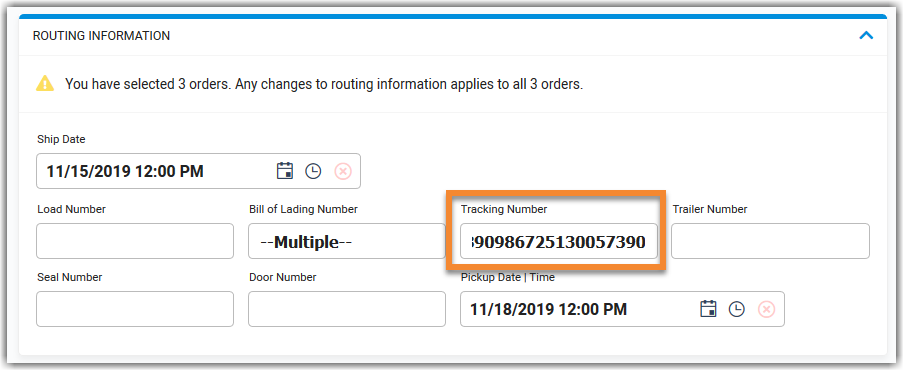
Please be aware that Amazon will reject the tracking update if the 'Carrier', 'SCAC', and 'Service' fields are left blank on an order.
- Complete the appropriate fields under 'Routing Information'—please note that the 'Tracking Number' is required for marking the selected order(s) as complete in Amazon.
- If needed, enter any 'Additional Charges' that may have accumulated—each charge will display in the grid. For multiple orders, be sure to specify whether you wish to 'Apply Charges' separately to each order or divide the charges across all selected orders evenly.
Please note that charges added here will be in addition to all automatic and manual charges that have already been applied to the selected orders.
- Click Ship and Close. If all necessary fields stated above are complete and accurate on the orders, the Amazon orders in your seller account will reflect the latest changes.
Set up email notifications
When Amazon orders are created or fail to import into the system, you can set up automated emails to notify the desired parties. If you'd like to set these up, provide your Professional Services representative with the contact information for whom you'd like to receive the notification. If you have already completed your setup, please contact api@3plcentral.com with this information instead.